How to Set Up Google Shopping in 7 Steps for Online Shops
Christian Beeking
Co-Founder, Cloudginny
November 18, 202613 min read
Last updated: November 18, 2026.
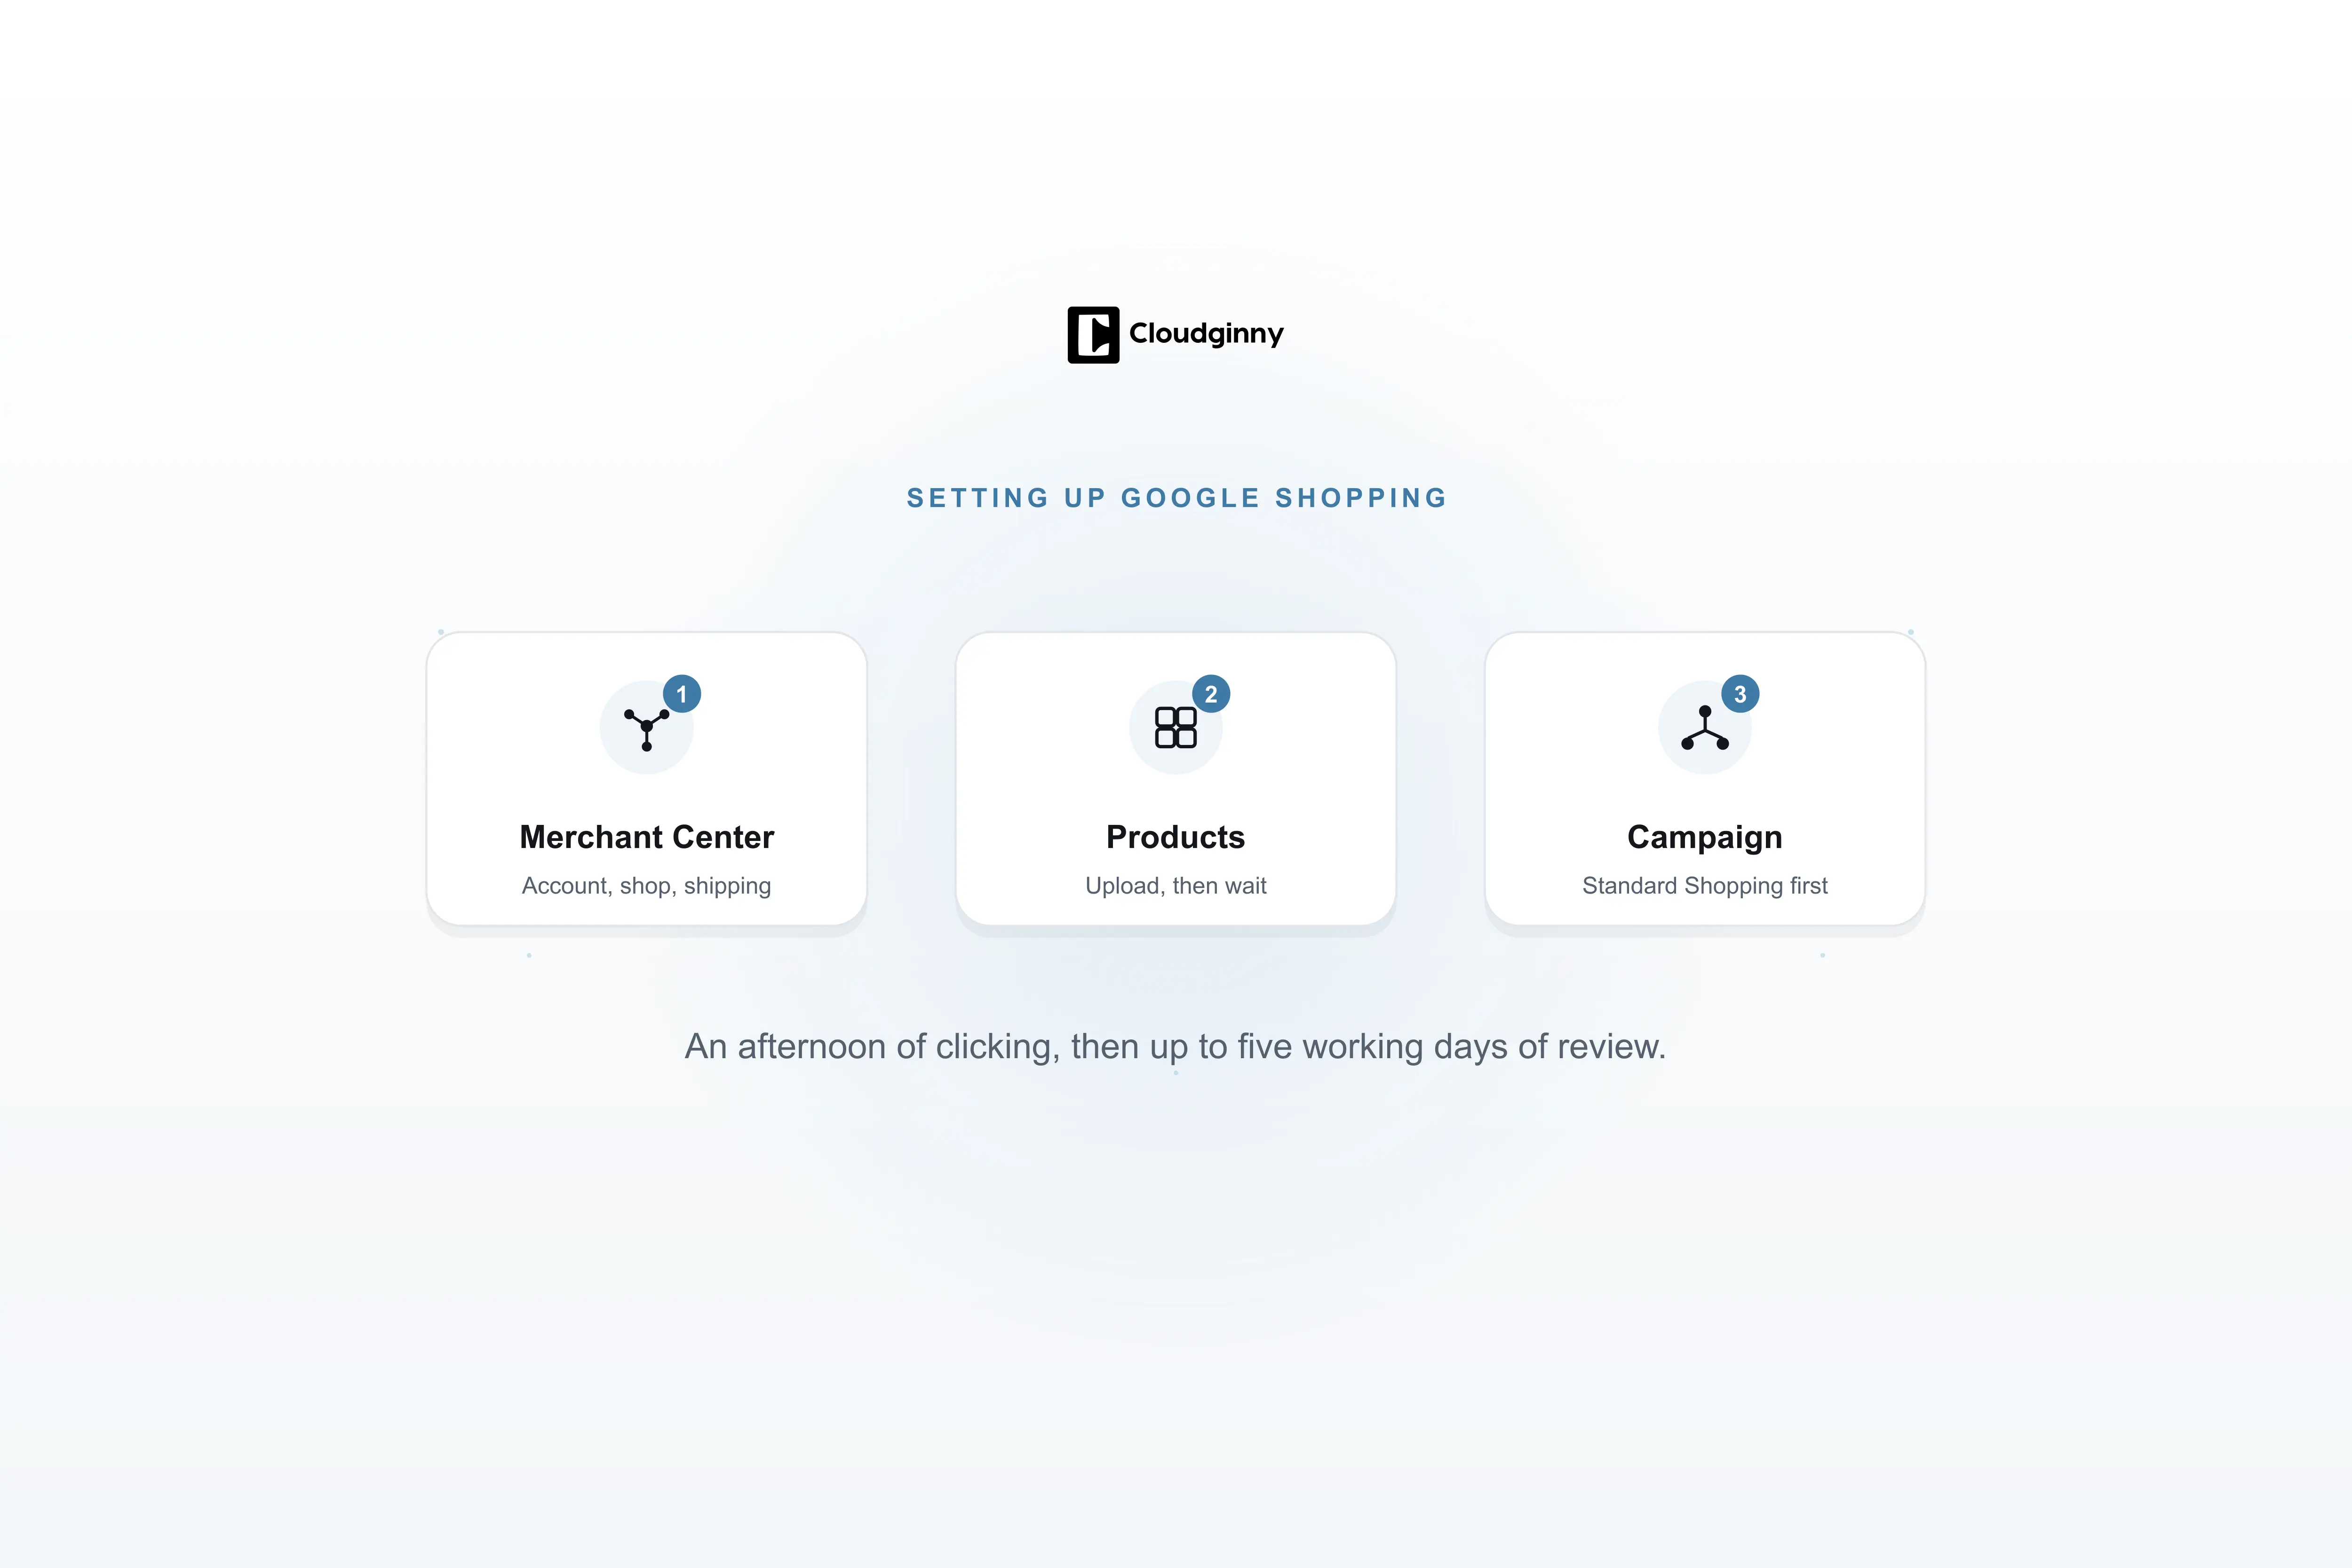
Setting up Google Shopping means creating a Merchant Center account, verifying your shop, adding shipping, uploading your products, linking the account to Google Ads and launching a Shopping campaign. With an app or plugin for your shop system, you can get the clicking done in an afternoon; after that, you wait up to five business days for the product review. What Google Shopping is and what it costs is covered in our guide Google Shopping for Retailers. This article is only about the path from an empty account to your first campaign.
The times are rough estimates for a shop running on a common shop system. You can do steps 5 to 7 while Google is still reviewing your products. The campaign then starts on its own as soon as the first products are approved.
Timeline from an empty account to your first ad
Day 1Steps 1 to 4: account, shop, shipping and products. With an app or plugin, one afternoon.
Up to 5 business daysGoogle reviews your products. You do steps 5 to 7 in the meantime.
After about a weekThe first products are approved and the campaign starts on its own.
14 days after launch at the earliestFirst changes to budget or bid strategy.
What you need beforehand
Conversion tracking, shipping costs, returns information and usable images need to be in place before you create the account. Otherwise you’ll get stuck at step 3 or 4.
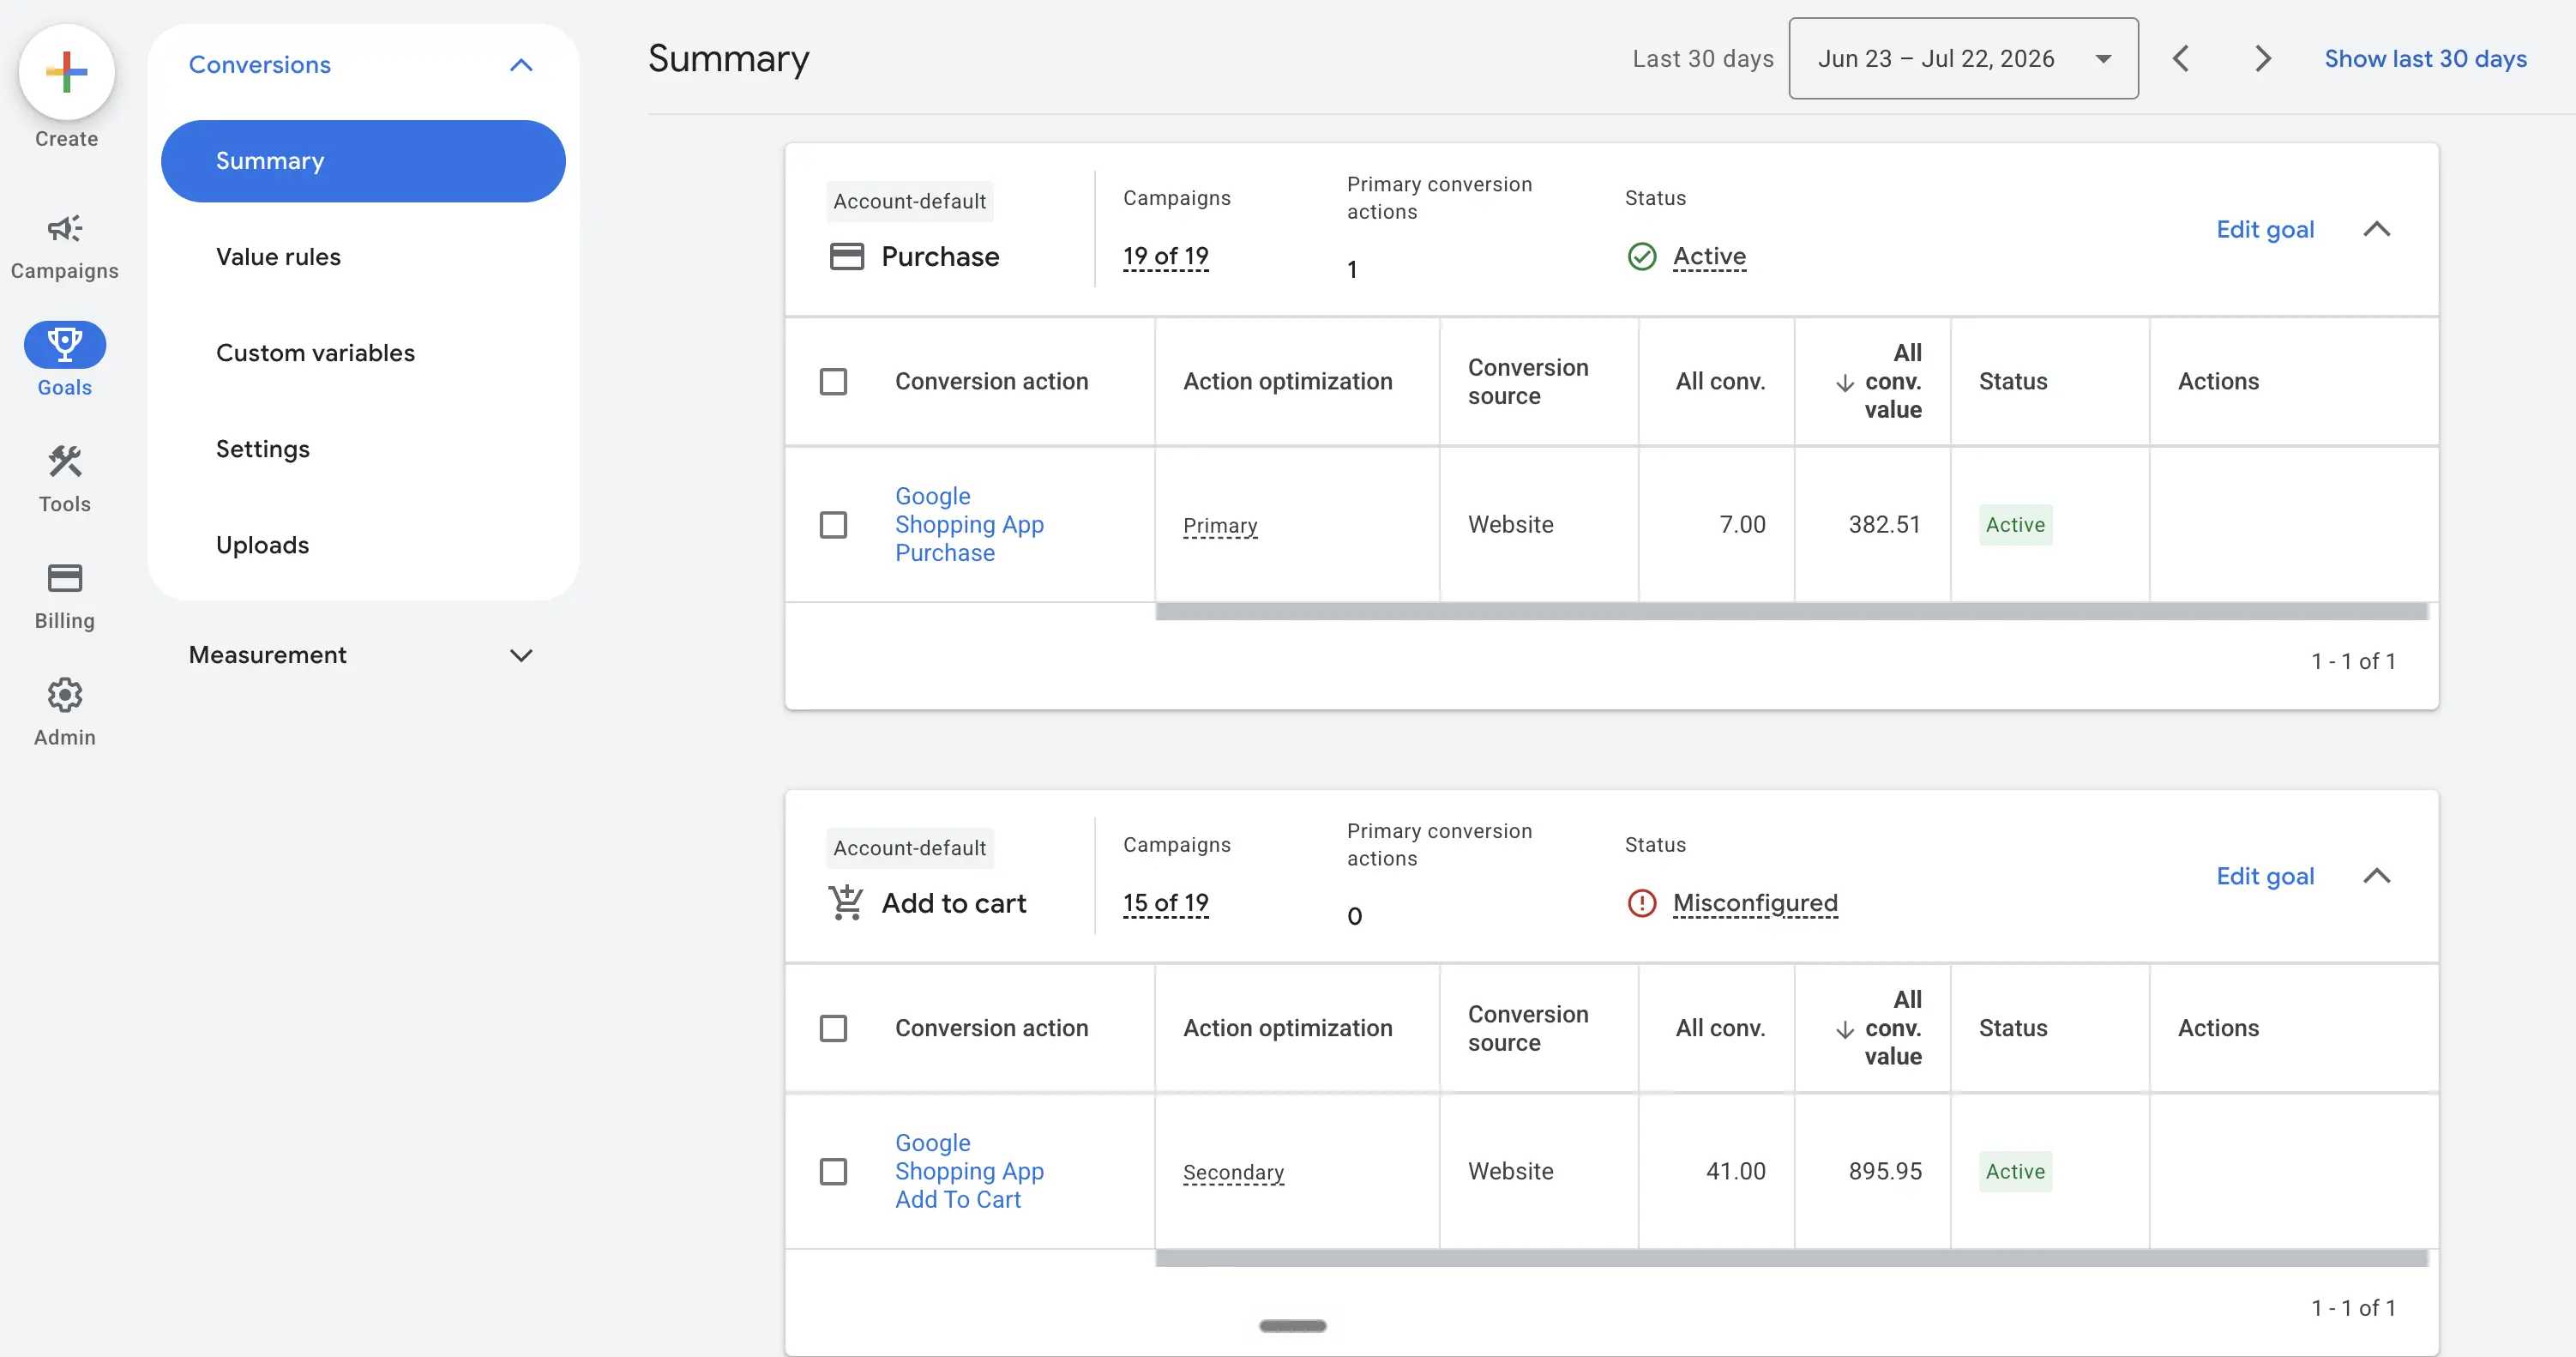
Conversion tracking: Google Ads has to receive every purchase along with its order value, and the purchase has to be the only primary conversion. Without that, the campaign will still run, but you won’t know what it brings in, and every automated bid strategy is optimizing blind.
This is how conversion tracking should look: only the purchase counts as a primary action. The “Misconfigured” notice on the cart goal is harmless here, because that goal deliberately runs as secondary only. Screenshot: Google Ads
Shipping costs: In Germany, Austria and Switzerland, Google requires shipping costs for every product, as stated in the Merchant Center help on shipping. Work out beforehand how much shipping costs per country, weight or order value, and at what point it becomes free.
Returns information in your shop: A page that’s easy to find and covers the return window, process and refund is mandatory. Add to that a legal notice with a way to contact you, a checkout over HTTPS and visible payment methods. If any of this is missing, Google may well suspend the entire account for misrepresentation.
Product images of at least 500 by 500 pixels: From January 31, 2027, this minimum size applies to main and additional images in all product categories. If you’re setting up now, upload larger images right away; Google recommends around 1,500 pixels per side.
On top of that, you need a Google account that belongs to the company rather than to an individual employee, a Google Ads account with a payment method on file and, for every branded product, the manufacturer’s GTIN.
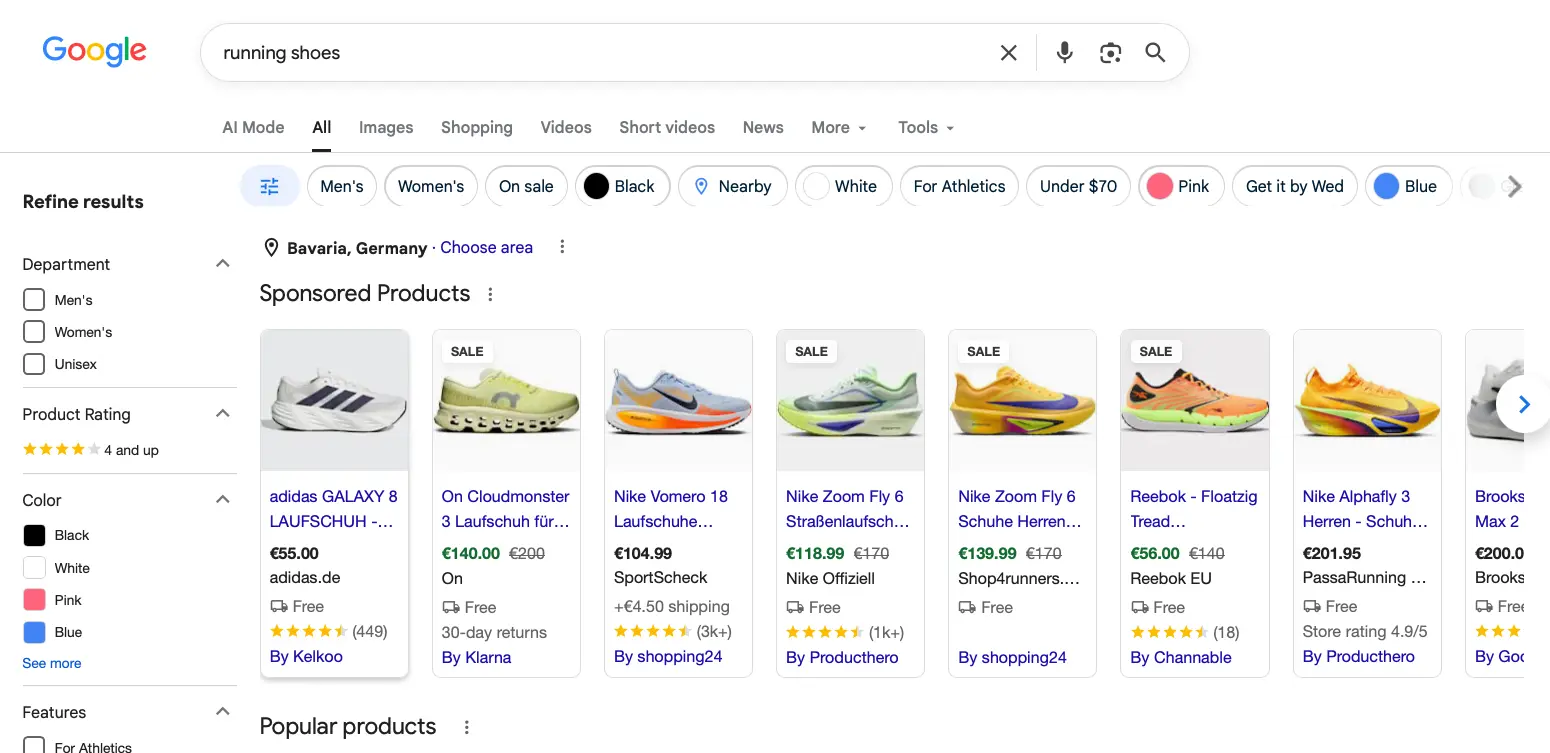
This is what Shopping ads look like in search: image, title and price come from your feed, and at the bottom of each ad is the comparison shopping service it runs through. Screenshot: Google Search, taken before free product listings were removed in the EEA
Step 1: Create a Merchant Center account
Go to merchants.google.com, sign in with the company’s Google account and enter your business name, country and shop URL. Google then asks whether you sell online, in a physical store or both, which checkout options you offer and whether your shop runs on a platform like Shopify.
Pay attention to the country. It means where your business is based, not the country you want to advertise in, and according to Google’s help it can’t be changed after the account has been created. If you pick the wrong country by mistake, you’ll have to create a new account. You set the countries you sell to in a later step, and you can add more at any time.
If you already have a Merchant Center account, say from an earlier attempt, use that one. Two accounts for the same shop lead to duplicate products and, in the worst case, a suspension.
Step 2: Verify and claim your online shop
Google wants to see that the shop belongs to you. Verifying proves you have access to the domain; claiming reserves it for your account. Both happen in one go in Merchant Center, under your business information.
The options are an HTML tag in the head section of your homepage, an HTML file on your server, Google Tag Manager or Google Analytics, provided the same Google account is an administrator there. The apps for Shopify and WooCommerce take care of this step on their own when you connect your shop to Google. If verification fails, it’s almost always because of a redirect between the address with and without www, or because the tag sits on a page Google can’t reach without signing in.
Leave the tag or file where it is afterwards. If you remove it during your next theme change, the account loses its verification and all your products expire. There’s more on this step and its error messages in our Merchant Center guide.
Step 3: Add shipping and returns
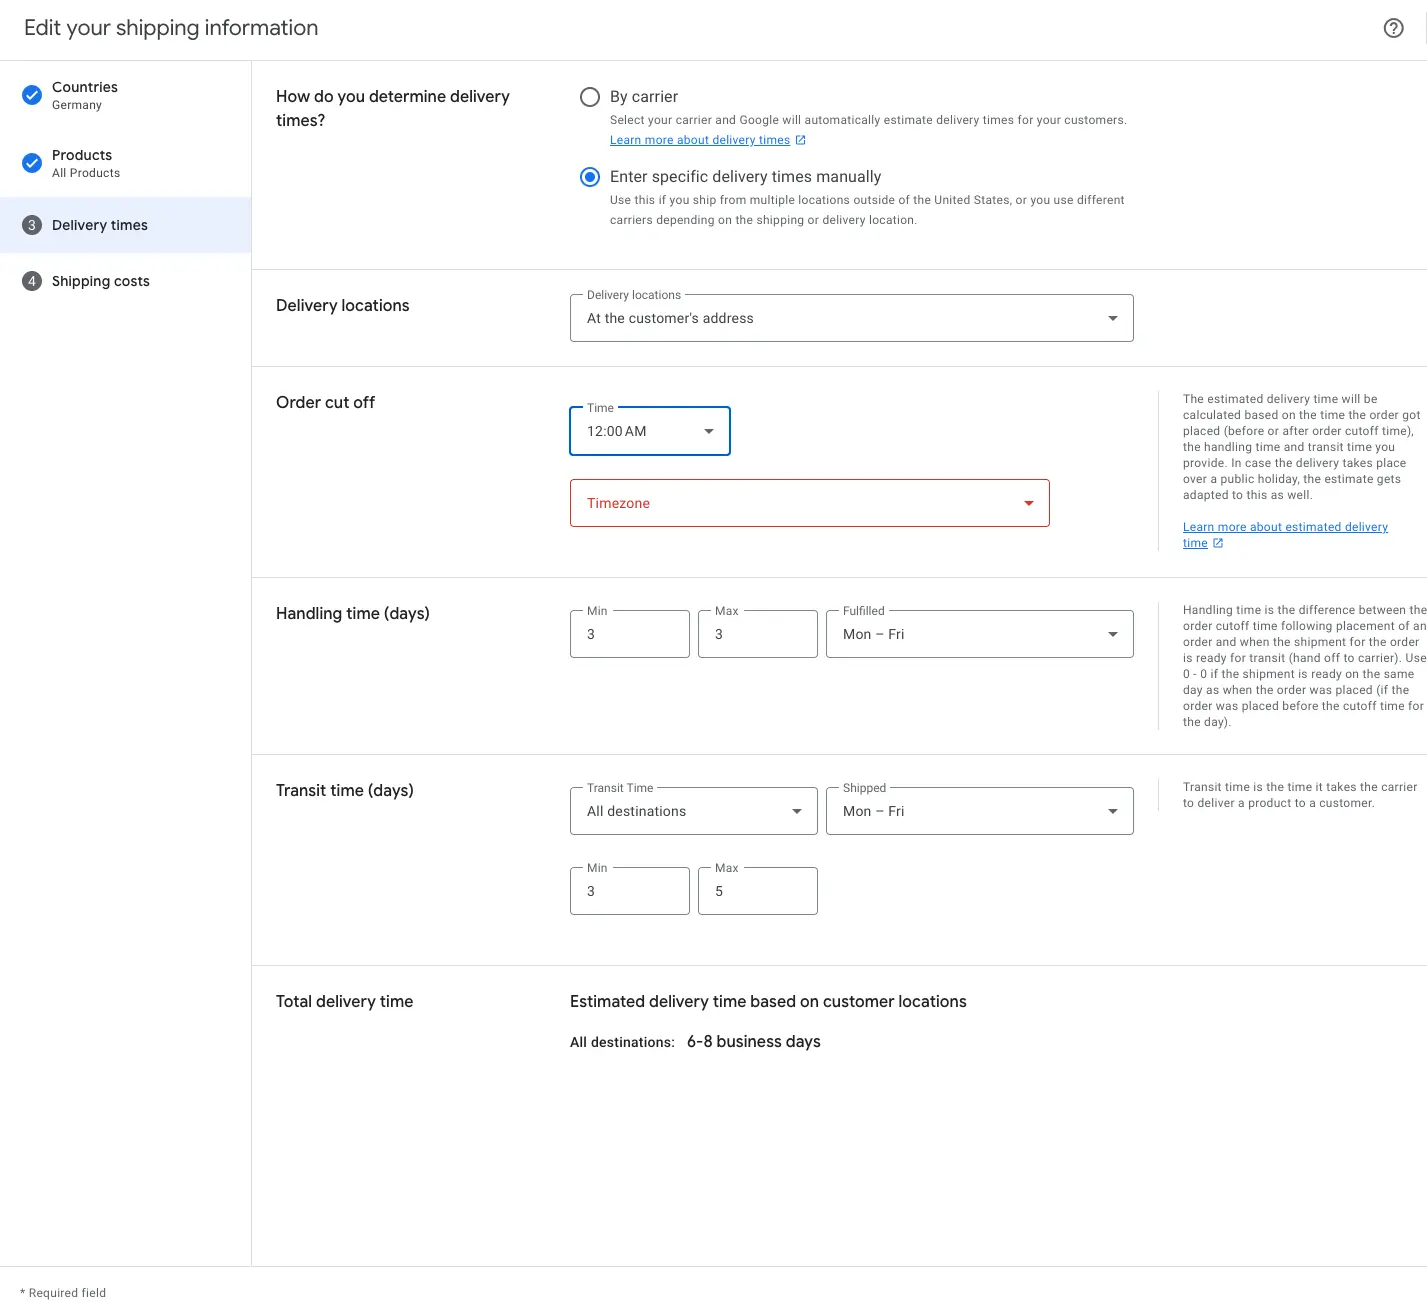
In Merchant Center, under Shipping and returns, create a shipping policy for each country you sell to: delivery time, costs, threshold for free shipping. The details have to match what your checkout shows. If Google shows €4.90 and your shop charges €5.90, Google disapproves the products. When in doubt, enter the higher value, because overstated shipping costs are allowed and understated ones are not.
You create the shipping policy in four steps: countries, products, delivery times and shipping costs. Here are the delivery times, made up of order cutoff, handling time and transit time. Screenshot: Google Merchant Center
Google treats returns differently. According to Google’s help, a return policy in Merchant Center is optional, while clear returns information on your website is mandatory. Add one in Merchant Center anyway. Google shows the return window and costs in the ad, and a visible “30-day returns” helps people decide to click.
Step 4: Get your products into Merchant Center
Almost always through your shop system’s app or plugin. Entering products by hand is only worth it for a handful of items, and a homemade spreadsheet goes out of date with the first price change.
We’ve described the route for each of the four common systems: Shopify transfers products through the Google & YouTube app, WooCommerce through the Google for WooCommerce plugin, Shopware through the product comparison sales channel and JTL through the Google Shopping export format. The details are in our guides for Shopify, WooCommerce, Shopware and JTL.
Whichever route you take, Google needs at least an ID, title, description, link, image link, price, availability and, for branded goods, brand and GTIN for each product. Before the first sync, check three products by hand: Does the price match the product page, does the image show the right variant, is the availability correct?
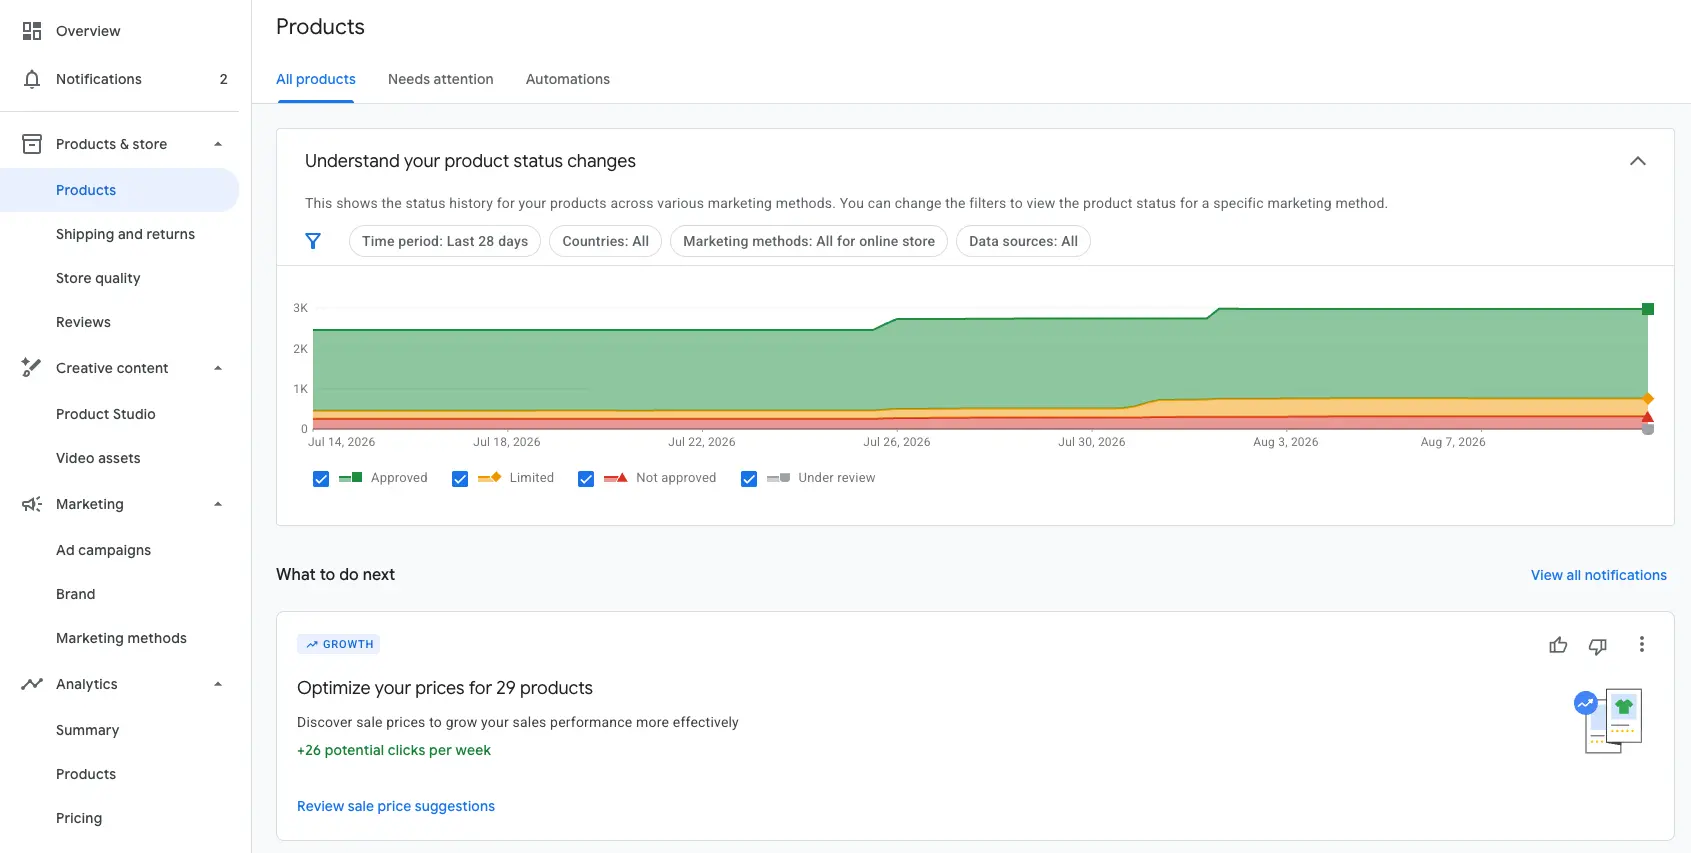
Then the wait begins. The first review for Shopping ads can take 3 to 5 business days; later changes to products that have already been reviewed go through much faster. During this time, the product overview shows “Under review”. Disapprovals appear in the “Needs attention” tab, along with the reason. What’s behind the most common ones is explained in our article on disapproved products.
The product overview shows how many items are approved, limited, not approved or still under review. Disapprovals are listed in the “Needs attention” tab. Screenshot: Google Merchant Center
Step 5: Link Merchant Center to Google Ads
Without the link, Google Ads can’t see your products. In Merchant Center, open “Apps and services” under “Access and services” in the settings, click “Add service”, choose Google Ads and enter the ten-digit customer ID of your Ads account. If you use the same Google account as administrator for both, Google suggests the account directly.
The request then has to be accepted in Google Ads, and this is where setups get stuck more often than anywhere else. As long as nobody clicks Approve there, the link stays pending, and no Merchant Center account shows up in the campaign setup. You’ll find the open request in Google Ads via the tools icon, in the Data manager under Google Merchant Center.
Step 6: Standard Shopping or Performance Max?
Start with Standard Shopping and add Performance Max once Google Ads brings in 30 to 50 orders a month. That’s the same recommendation as in our shop guides, and the reason is always the same: Performance Max decides on its own where and for whom it bids, and it needs sales as learning material to do that. A new account has none.
Standard Shopping shows you every search term and lets you exclude individual products and tier your bids by margin. In the first few weeks, you learn which items sell and which search queries only cost money. With that knowledge and the conversions you’ve collected, Performance Max gets off to a much better start later on.
Standard Shopping
Performance Max
When to start
from the start, even in a new account
once Google Ads brings in 30 to 50 orders a month
Who’s in control
you: see search terms, exclude products, tier bids by margin
Google decides on its own where and for whom it bids
Needs
no sales data
sales as learning material
If your account already has sales data from Search campaigns, you can add Performance Max sooner. The threshold depends on the conversions in the account, not on the age of the Shopping campaign.
Step 7: Create your first Google Shopping campaign
In Google Ads, click the plus button, then New campaign. Google’s help on Standard Shopping campaigns walks you through the same fields; here they are with the starting values we recommend.
Choose Sales as the objective and Shopping as the campaign type. Then select the linked Merchant Center account. This selection can’t be changed once the campaign has been created, so if you have several accounts, double-check. If Google suggests Performance Max at this point, stick with Standard Shopping.
For the bid strategy, choose “Maximize clicks” or manual bids. With “Maximize clicks”, check the box below it for “Set a maximum cost per click bid limit”. That’s the most Google is allowed to bid for a single click. Without it, the strategy pulls as many clicks as possible out of the daily budget, expensive ones included. A target ROAS only becomes an option once the campaign has collected at least 15 conversions in 30 days, which is Google’s own minimum. A maximum CPC bid of around €0.60 has worked well for us: the median cost per click for Shopping in our client accounts is €0.42, with the middle half between €0.27 and €0.57.
The daily budget is your monthly budget divided by 30. To start with, we recommend €500 to €1,500 a month, which works out to €17 to €50 a day. Below that, the campaign collects data too slowly for you to say anything about it after four weeks.
Under locations, enter the countries you’ve set up shipping for, usually just your home country at the start. Under networks, uncheck Google search partners until you know what the campaign achieves on Google Search itself. Campaign priority stays at Low; it only comes into play when several Shopping campaigns share the same products.
Finally, create an ad group. At first, it contains all your products in a single product group. You don’t write any ad copy; Google builds the ad from the title, image and price in your feed. Then publish. Once the campaign is live, split the product group by category, brand or a custom label for margin, so that an expensive item with a high margin gets a different bid than a low-value add-on item.
The starting settings at a glance
Setting
Starting value
Objective
Sales
Campaign type
Shopping, not Performance Max
Merchant Center account
the linked one; can’t be changed after creation
Bid strategy
“Maximize clicks” with a maximum CPC bid of around €0.60, or manual bids
Target ROAS
only after 15 conversions in 30 days
Daily budget
€17 to €50, i.e. €500 to €1,500 a month
Locations
the countries you’ve set up shipping for
Networks
without Google search partners
Campaign priority
Low
Ad group
all products in one product group; split it up after launch
If that’s too many fields for you: Ginny sets up Google Shopping campaigns in chat. You name the budget and goal, get the structure as a proposal and approve it before anything goes live.
After launch: what to check in the first week
In the first week, you check approvals, impressions, tracking, search terms and the product report. Leave bids and budget alone.
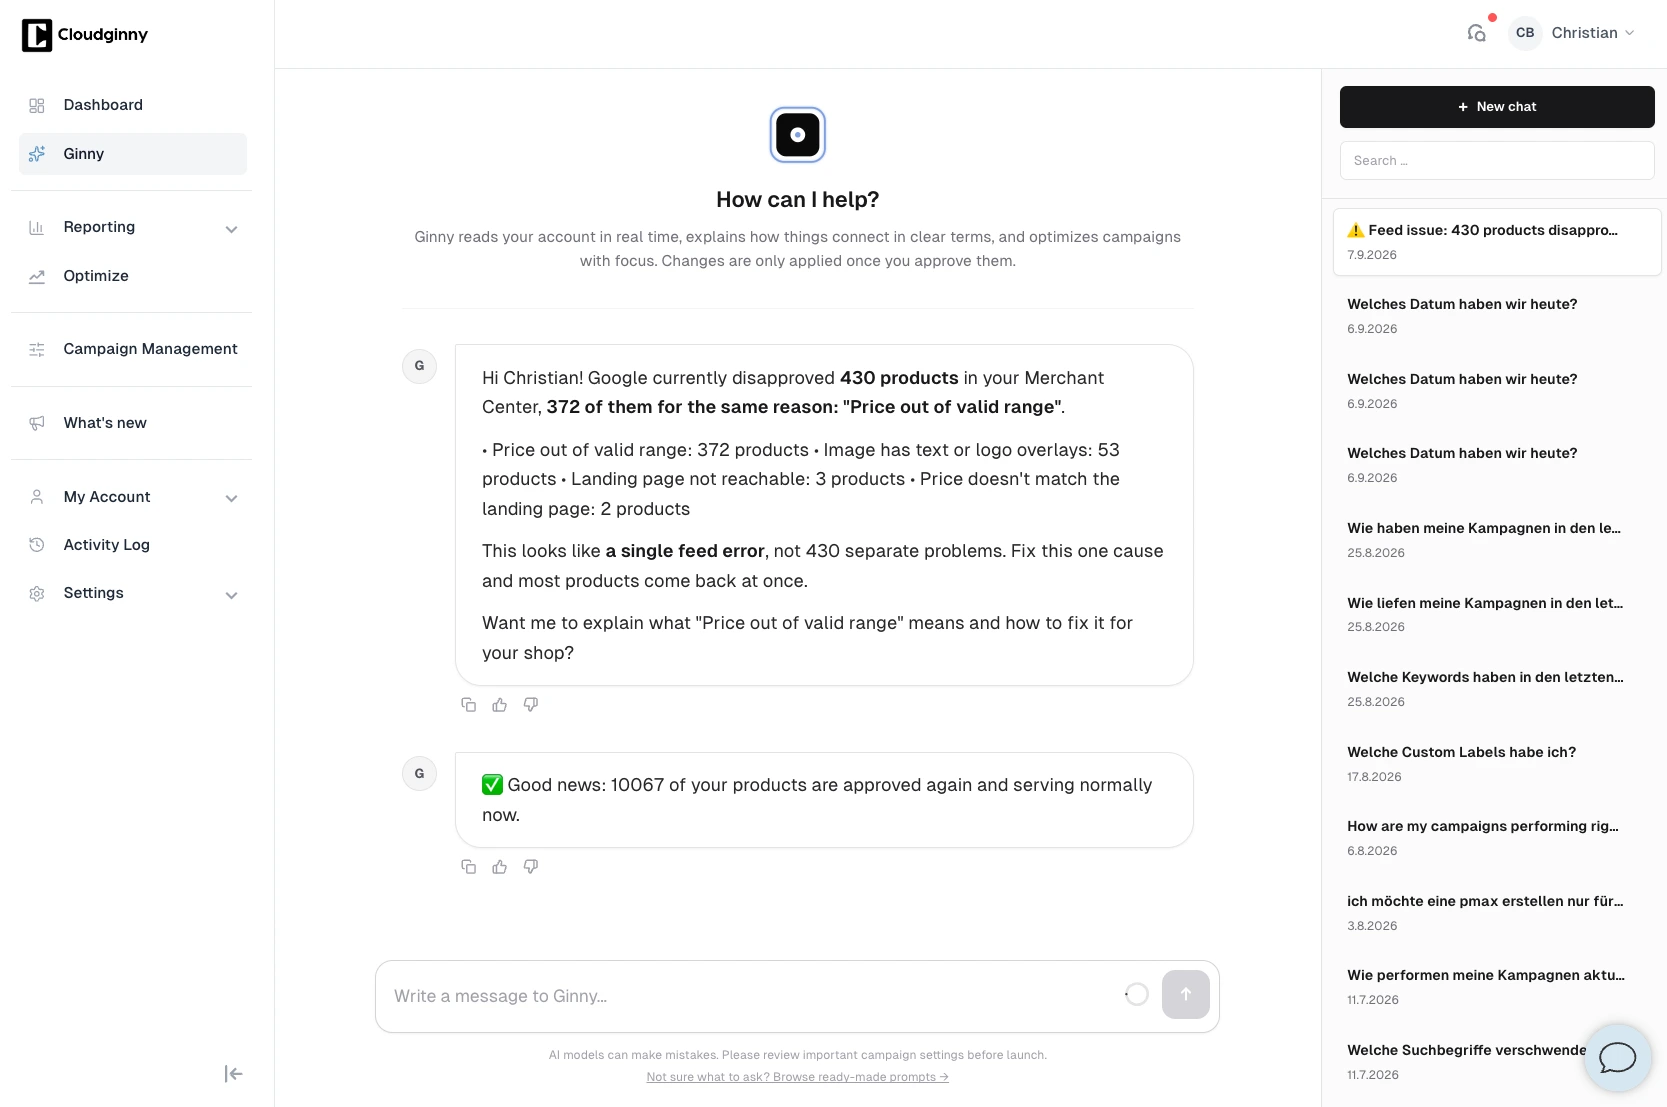
On day one, check in Merchant Center whether products are approved and what’s listed under “Needs attention”. Disapprovals are rare in our client accounts, with a median below one percent, but they’re most frequent in the first week of a new account, usually because of mismatched prices or missing GTINs.
Ginny groups disapprovals by reason: here, 372 of 430 share one reason, “Price out of valid range”, which points to a single feed error. Screenshot: Cloudginny
On day two or three, check in Google Ads whether the campaign is getting impressions. If it isn’t, either no product has been approved yet, the link hasn’t been accepted or the maximum CPC bid is too low. Also place a test order and check whether it arrives in Google Ads exactly once and with the right value.
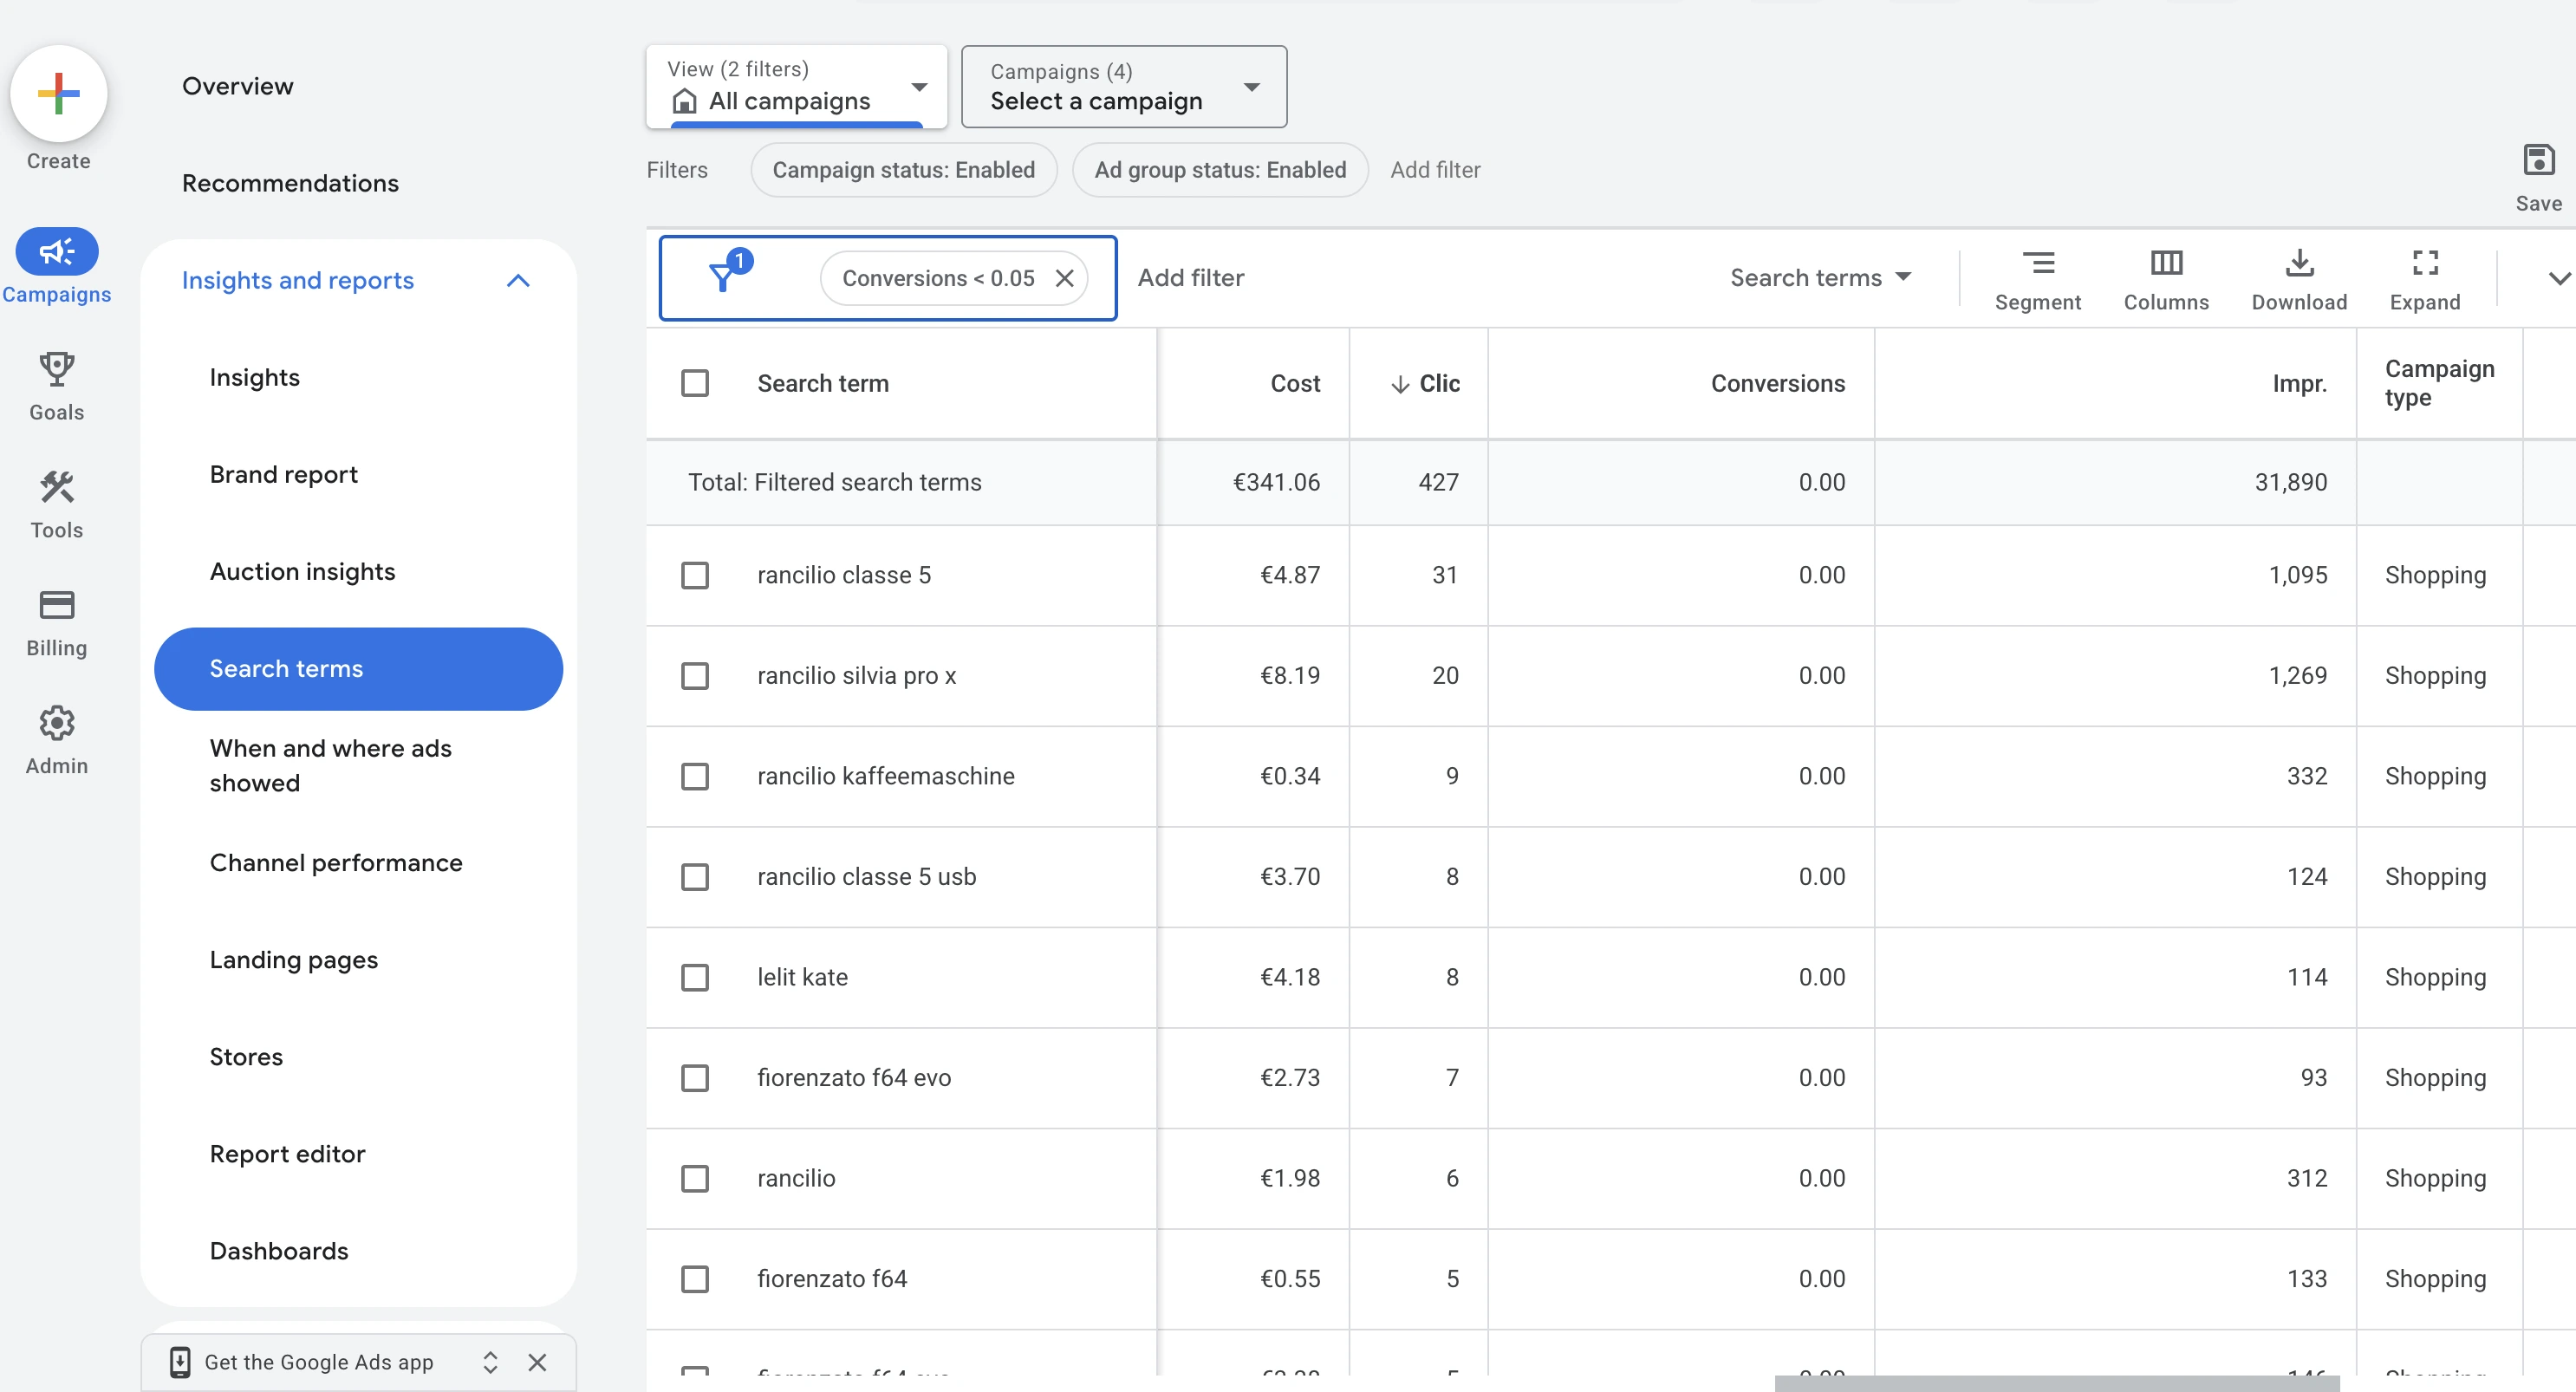
From day four, the search terms report is worth a look. Exclude anything that clearly doesn’t fit your range, such as “used”, “spare part” or brands you don’t carry. In the established accounts we manage, around a tenth of the budget goes to search terms that never sell; in new accounts, it’s more. How Ginny finds such terms is shown on our page about negative keywords.
Filtered to terms without a conversion, the search terms report shows what you paid for without making a sale. Whatever doesn’t fit your range, you exclude. Screenshot: Google Ads
At the end of the week, look at the product report. Usually a few items get almost all the clicks, and a large part of the catalog doesn’t get a single impression. In our accounts, only just over one in three approved products gets any paid impressions at all, measured as a median. That’s normal at the start, and it’s the reason to split up the product groups.
What you don’t change this week are the bid strategy and the budget. Google recommends evaluating results after two weeks at the earliest, and we do the same: in our accounts, at least 14 days pass between two changes to budget or bid strategy. How to continue from there is covered in our guide Google Ads Optimization.
Frequently asked questions about setting up Google Shopping
How long does it take to set up Google Shopping?
With an app or plugin, the clicking takes two to three hours. After that, Google reviews the products, which for a new account can take 3 to 5 business days. So from creating the account to the first ad, it takes about a week.
How much does it cost to set up Google Shopping?
Merchant Center and setting up the campaign cost nothing; you pay for clicks on the ads. The median cost per click in our client accounts is €0.42. How that turns into a cost per order is worked out in our guide to Google Ads costs.
Can I use Google Shopping without Google Ads?
In the European Economic Area, effectively no longer. Google removed free product listings from the regular search results there in September 2026. Since then, Merchant Center alone no longer gets your products into Search; for that, you need a campaign in Google Ads.
How do I create a Google Shopping campaign?
In Google Ads, click New campaign and choose Sales as the objective and Shopping as the campaign type. You choose the linked Merchant Center account, the bid strategy, the daily budget and the countries, and create an ad group with your products. The prerequisites are approved products and an accepted link between Merchant Center and Google Ads.
Why aren’t my products showing after setup?
Usually the review is still running, the link wasn’t accepted in Google Ads or the maximum CPC bid is too low for your category. Check in this order: product status in Merchant Center, the link in the Data manager in Google Ads, impressions and bid in the campaign.
Do I need a CSS for Google Shopping?
You automatically have one. In Europe, every Shopping ad runs through a comparison shopping service (CSS), and a new Merchant Center account is assigned to Google Shopping by default. You don’t need to change anything to get started.
Christian Beeking is co‑founder of Cloudginny, the AI agent for automating Google Ads in e‑commerce. Before Cloudginny, the team managed more than 100 million euros in Google Ads budget for brands such as MediaMarkt, Cisco and Bose, and has now poured that knowledge into Ginny. Cloudginny is an official Google Partner, a WebStollen partner and part of the German Accelerator.
Most guides to WooCommerce and Google Ads date from the time when the plugin was still called Google Listings & Ads and free product listings showed up in Google Search. Both have changed. This guide shows the 2026 route: plugin or feed extension, shipping and unit price, tracking without double counting, the most common errors and why the campaign belongs directly in Google Ads.
Most guides to Google Ads optimization are lists of ten equally weighted tips. In an online shop, though, the order decides: if you fine-tune bids while Google counts page views as sales, you only amplify the error. This guide shows the five levers in the order in which we tackle shop accounts, with figures from our customer accounts and the right rhythm for changes.
A Google Shopping agency only pays off from around $7,500 to $10,000 in monthly ad spend, and the feed tool, CSS fee and setup come on top of its fee. Most shops spend far less. This article covers what a Shopping agency really costs, what’s behind the promised 20 percent CSS savings, how to spot a bad offer and when an AI is enough for ongoing maintenance.