Setting up Google Ads for a JTL shop comes down to three things above all: correctly connected conversion tracking, a clean product data connection to the Google Merchant Center, and a well thought out campaign structure. At first glance that sounds fairly simple, but these are exactly the three points where most JTL merchants come unstuck. Industry analyses estimate that, on average, 20% to 30% of a Google Ads budget goes to irrelevant or invalid clicks that never lead to a sale.
This guide is aimed at JTL shop operators with a monthly Google Ads budget between €500 and €20,000 who either want to build their setup correctly from the ground up or cleanly audit an existing account. We go through everything step by step, covering only what truly matters in 2026.
For e-commerce shops, Shopping Ads (Performance Max or classic Shopping Ads) are the most important ad type. They account for around 76% of all retail search ad spend and generate roughly 85% of all clicks on Google Shopping and Search campaigns. Even in a world where more and more traffic comes from AI agents, product ads remain important.
TL;DR
Here are the five most important steps for JTL shops that want to sell successfully with Google Ads:
Check the foundation. Before the first euro flows, your JTL shop, Google Merchant Center, Google Ads account, and product feed all need to be set up cleanly.
Set up conversion tracking correctly. Ideally a purchase event with a dynamic order value via Google Tag Manager. If you prefer something simpler, you can install the plugin from Webstollen with a clear conscience; it is done in just a few minutes.
Keep the product feed clean. Complete required fields (GTIN, brand, title) and a daily refresh are the basis for every Shopping and Performance Max campaign. Your JTL shop already ships with the right export. You simply have JTL hand the feed over to Google Ads as a daily ZIP file.
Match the campaign structure to the budget. Small accounts do best with a simple strategy. Our recommendation would be one Performance Max campaign plus one brand campaign. Larger accounts get more out of it when they segment by margin and product range.
Control the default settings. Most budgets fail because of unsupervised default settings, such as the location option "Presence or interest" in Performance Max, or automatic placement in Gmail, Discover, and YouTube.
Content
Example shop
To make the steps tangible, we'll use an anonymized example shop throughout this blog. Our shop is a JTL furniture store with roughly €4,000 in monthly Google Ads budget that has been stuck at a ROAS of 2.1 for months and doesn't know why.
What do I need before I launch my first Google Ads campaign for my JTL shop?
Before the first euro flows, four fundamentals need to be in place. A technically clean JTL shop, a verified Google Merchant Center, a configured Google Ads account, and a working product data feed from JTL.
In concrete terms, that means:
Loading times, mobile display, and a working checkout are basic requirements. Every click you buy through Ads is wasted if the shop behind it doesn't deliver. That is of course independent of where the traffic comes from. A fast, easy to understand shop is the biggest lever you have for more revenue.
Google Merchant Center verified: This is where your product data lands, which is later served in Shopping and Performance Max campaigns. By default, JTL offers an export of your product data as a ZIP file.
Google Ads account linked: The Merchant Center and the Google Ads account need to be connected so that product data can be used in campaigns.
Product data feed from JTL: The feed transfers your article data, such as title, images, prices, and availability, to the Google Merchant Center automatically and daily. The key thing is that this data is cleanly maintained and that every article has an image assigned to it. The biggest lever for Google Ads is the product title. Instead of "dining table wood 2 x 2 m" you are better off following a fixed formula that depends on the category: brand + product name + feature. So the example becomes something like: "Massivium 'Thor' Dining Table 180x90 cm Solid Oak, Natural Oiled".
Takeaway
Without a clean foundation (shop, Merchant Center, Ads account, feed) you should not put money into this channel. Invest the time in the basics first. A professional athlete doesn't show up to the competition in jeans and sandals either.
Why isn't my JTL shop tracking purchases in Google Ads?
The most common cause of missing purchases or missing revenue is incompletely configured conversion tracking. Most of the time it simply isn't set up correctly, or isn't set up at all. Without correct tracking, Google Ads doesn't know which clicks lead to real sales and therefore cannot optimize campaigns properly for your shop.
How to set up conversion tracking
Here's how to set up conversion tracking for your JTL shop correctly:
Embed Google Tag Manager: Integrate the GTM container into your JTL template (in the header and after the opening body tag).
Create a conversion action in Google Ads: Create a conversion action for "Purchase" in your Ads account and note down the conversion ID and label.
Trigger the purchase event in Tag Manager: On the order confirmation page ("Thank you for your order"), a tag must fire that passes the purchase value (order total) and the conversion data to Google.
Pass a dynamic value: Instead of a fixed value, you should pass the actual order value so that Google can optimize for revenue rather than for count.
Test with the Tag Assistant: Before you spend the budget, place a test order and check whether the event fires cleanly.
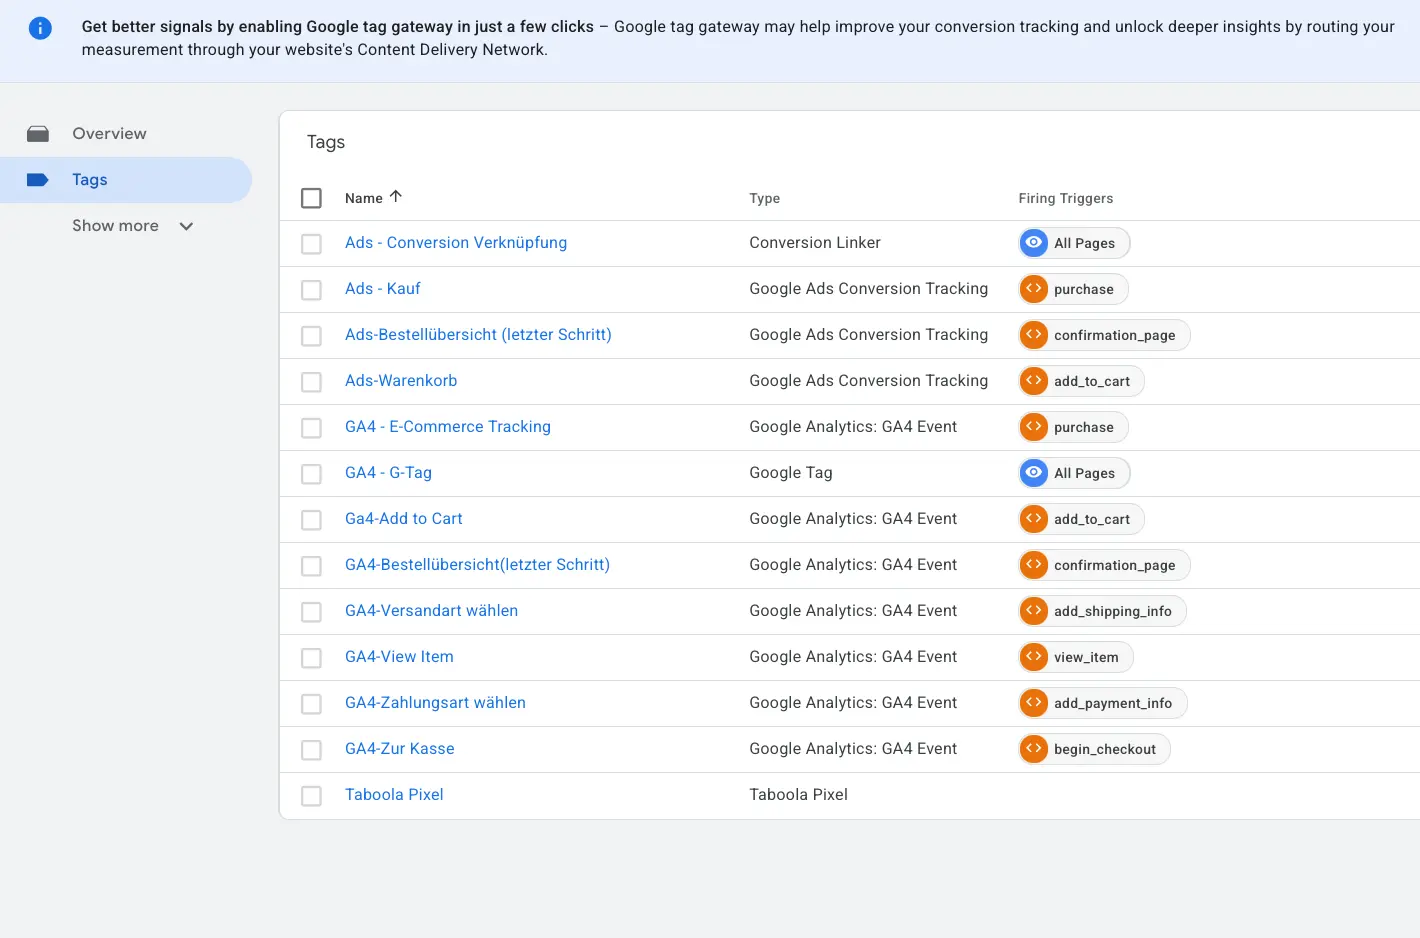
A cleanly built container: alongside the purchase tag, cart and checkout steps fire as their own events.
Expensive classic
This is a common and expensive mistake. Many JTL shops do track purchases, but not the cart value. In that case, Google (Smart Bidding) lacks the data to optimize for high value purchases. The result is that your account cannot reach its full potential.
Example shop
With our JTL furniture shop, this was exactly the cause of the stuck ROAS (Return on Advertising Spend). The purchase was being tracked, but without a dynamic order value, meaning without the revenue. As a result, Google optimized for the pure number of purchases rather than for revenue. A €1,500 sofa counted just as much as a €30 cushion.
Incorrect or missing conversion tracking is the most expensive setup mistake of all. Without correct purchase value transfer, the entire system works blind. It is definitely worth investing time and money here.
Consent Mode v2: without this signal Google Ads only measures half of it
Consent Mode is not a cookie banner and not a legal basis. It is an interface through which your Google tags adapt their behaviour to the user's decision. The consent itself is collected by your consent tool (CMP), Consent Mode only reports what the user clicked. Legally, and independently of this, you still need a clean opt-in under GDPR and, in Germany, Section 25 TDDDG: active agreement, no pre-ticked boxes, an equally prominent reject button on the first layer. Consent Mode becomes mandatory through Google's EU user consent policy, which applies to users in the EEA, the UK and Switzerland. Failing to comply risks suspension, according to Google.
There are four signals: ad_storage for advertising cookies and device IDs, ad_user_data for sending user data to Google for advertising purposes, ad_personalization for personalised advertising and remarketing, and analytics_storage for analytics cookies. The middle two arrived with version 2, and those are exactly the ones most often missing in practice. In basic mode the Google tags only load after consent, nothing flows without it, and Google models with a general model only. In advanced mode the tags load immediately with the default value denied and send cookieless pings, which lets Google build a more detailed model adapted to your account.
This is not a purely technical decision
Advanced mode sends data before consent is given. Whether that is compatible with Section 25 TDDDG has not been decided by any German court so far, and the supervisory authorities disagree. Settle this with your data protection officer or your lawyer and document the decision. This section is a technical orientation, not legal advice.
How to set up Consent Mode v2
Take stock, around 30 minutes. In Google Ads under Goals, Conversions, open a conversion action and check the Diagnostics tab. If there is nothing about consent mode, it is not running.
Decide on a mode and document it. Basic or advanced, together with your data protection officer. With advanced mode, the cookieless pings belong in your privacy policy.
Prepare the JTL shop. The built-in consent manager does not bring Consent Mode v2 on its own. Check the JTL extension store for the currently required plugin versions, then verify under Appearance, Standard elements, Consent Manager that Google Analytics, Google Ads and Google Tag Manager exist as separate entries.
Wire the CMP correctly in Tag Manager. Import the CMP template, add it as a tag and link it exclusively to the Consent Initialization, All Pages trigger. Set the defaults for all four signals to denied in the EEA and make sure an update follows immediately on every banner interaction.
Secure non-Google tags. In GTM under Admin, Consent settings, go through every tag. Meta Pixel, Pinterest, Hotjar and everything else need the option Require additional consent for tag to fire, otherwise they fire unchecked.
Test both cases. In Tag Assistant all four signals must show Denied on the first consent event and switch to Granted after clicking accept all. Then run the same pass with reject all, and cross-check in an incognito window on the live site.
The most common mistake: the CMP tag sits on the wrong trigger
In many shops the consent tag sits on a normal All Pages trigger instead of Consent Initialization. The defaults are then set too late, and the Google tags read the consent status before it even exists. From the outside everything looks fine: the banner appears, the buttons respond, nobody notices anything. Only the reported conversions are permanently too low and Smart Bidding optimises on a distorted signal. You can spot it in Tag Assistant in two minutes: if the consent tab shows empty values or even Granted on the first event, that is exactly your problem.
From our practice: the effects reach beyond pure conversion measurement. Expect remarketing lists to grow considerably more slowly as well when the signals are not set cleanly. Google itself officially describes mainly the consequences for measurement, the rest you see in the accounts.
Takeaway
And one expectation check: modelled conversions only start once you reach a minimum volume of ad clicks. Many smaller JTL shops are below that and therefore see no modelling despite a correct setup. If diagnostics say the thresholds are not met, your setup is fine, you are simply missing volume.
How do I connect JTL to the Google Merchant Center?
The connection between JTL and the Google Merchant Center runs through a product data feed that transfers your article data automatically and regularly. By default, JTL offers an automated daily import here.
What matters with the feed:
Required fields complete: Title, description, image URL, price, availability, GTIN, and brand must be cleanly maintained. Missing GTINs or availability lead to rejected products.
Up to date availability and prices: The feed should be refreshed at least daily so that sold out articles are no longer advertised.
Image quality: Clean, cut out product images noticeably increase the click rate.
JTL-Wawi: this is where data quality is created, not in the Merchant Center
Almost every rejection reason the Merchant Center diagnostics report has its origin in JTL-Wawi. Missing GTIN, empty manufacturer, no image, no description: these are not feed problems, they are maintenance problems. Most of the relevant fields sit in the article master data on the General tab, meaning GTIN, manufacturer, HAN, article name, prices, tax class, categories and stock management. The texts live on the Description tab, the images on Images, the extra information on Attributes and Characteristics. From there the data flows into the shop via the online shop sync. After larger bulk edits you need a full sync, otherwise only part of it arrives.
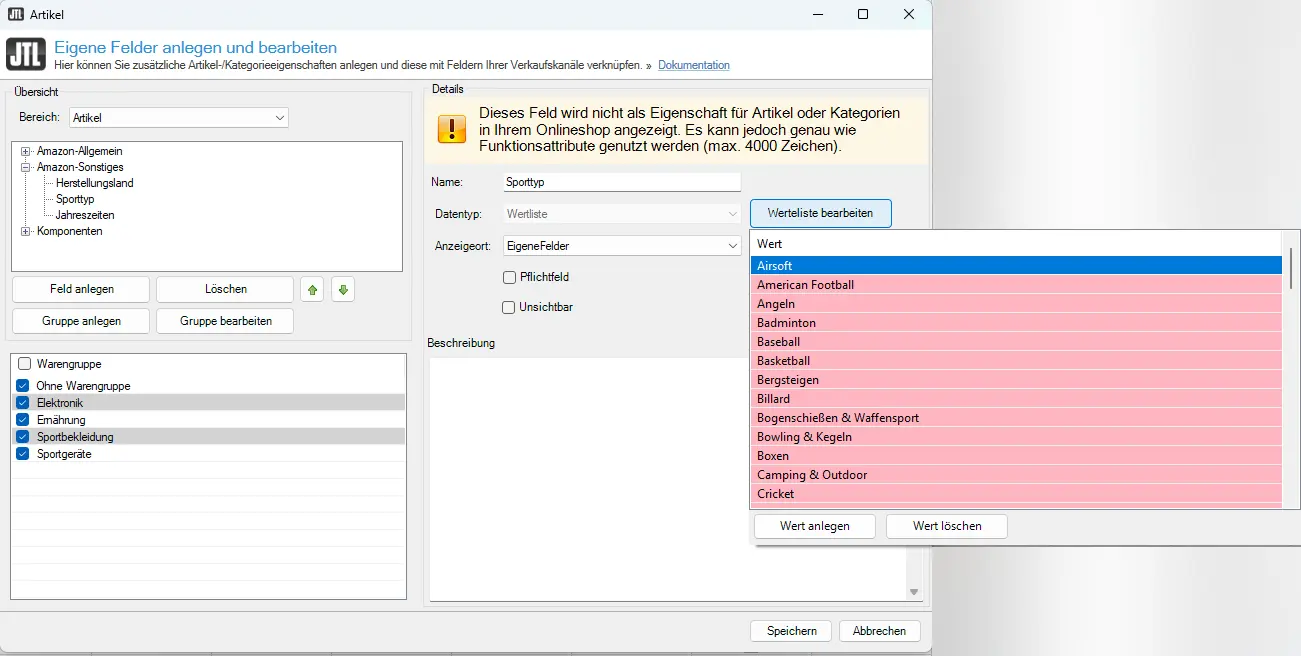
Everything Google requires but that has no standard field in Wawi is mapped through characteristics and function attributes. For articles without an official GTIN, so own brands and one-off pieces, you create a function attribute bIdentifierExists with the value false and assign it to the affected articles. Important for characteristics such as colour or size: if the option to use the characteristic as an article characteristic in the online shop is not enabled in Wawi, it will not even appear in the plugin mapping.
This is how you create a custom field with the data type value list in JTL-Wawi. You create bIdentifierExists with the value false the same way. Source: JTL guide, creating custom fields
This is how the assignment looks in the standard export format. JTL does not publish an official, complete mapping table, and the assignments can differ per plugin version. Check them once against your own feed.
General, GTIN→g:gtinrequired as soon as the manufacturer has assigned one
General, manufacturer→g:brandneeded in practice for almost every product
General, HAN→g:mpnrequired if no GTIN exists
General, article name→titlerequired, maximum 150 characters
Description tab→descriptionrequired, maximum 5,000 characters
General, prices→g:pricerequired, in Germany including VAT
General, stock management→g:availabilityrequired, values such as in_stock or out_of_stock
Images, image with sort number 1→g:image_linkrequired, image must be released for the JTL shop
Function attribute bIdentifierExists→identifier_existsfor own brands and one-off pieces without GTIN
The most common maintenance mistakes in Wawi
GTIN field empty although the manufacturer has assigned an EAN. Google rejects such products or limits their visibility.
Made-up barcodes or your own article number in the GTIN field. A valid GTIN has 8, 12, 13 or 14 digits and a correct check digit.
Duplicate manufacturers such as Bosch, BOSCH and Bosch GmbH side by side. This splinters the brand in the feed and in the filter navigation.
Description empty. The export format filters such articles out by default. They are then silently missing from the feed instead of being visibly rejected.
The same GTIN for all variants, or the GTIN maintained only on the parent article. Google requires an own GTIN per variant.
Patching errors only in the Merchant Center. The old state is back after the next sync. Always go back to the Wawi field causing it.
Typical stumbling block
This is a typical JTL stumbling block. Product data that looks good in the shop but arrives incomplete in the feed. After the first feed transfer, check in the Merchant Center how many products were rejected and why. Often this is also due to missing shipping costs or return policies.
Takeaway
The product feed is the basis of all Shopping and Performance Max campaigns. Bad feed data means bad campaigns, no matter how good the bidding strategy is. Our e-commerce clients make 90% of their revenue with Shopping or PMax campaigns.
Setting up Google Shopping for your JTL shop
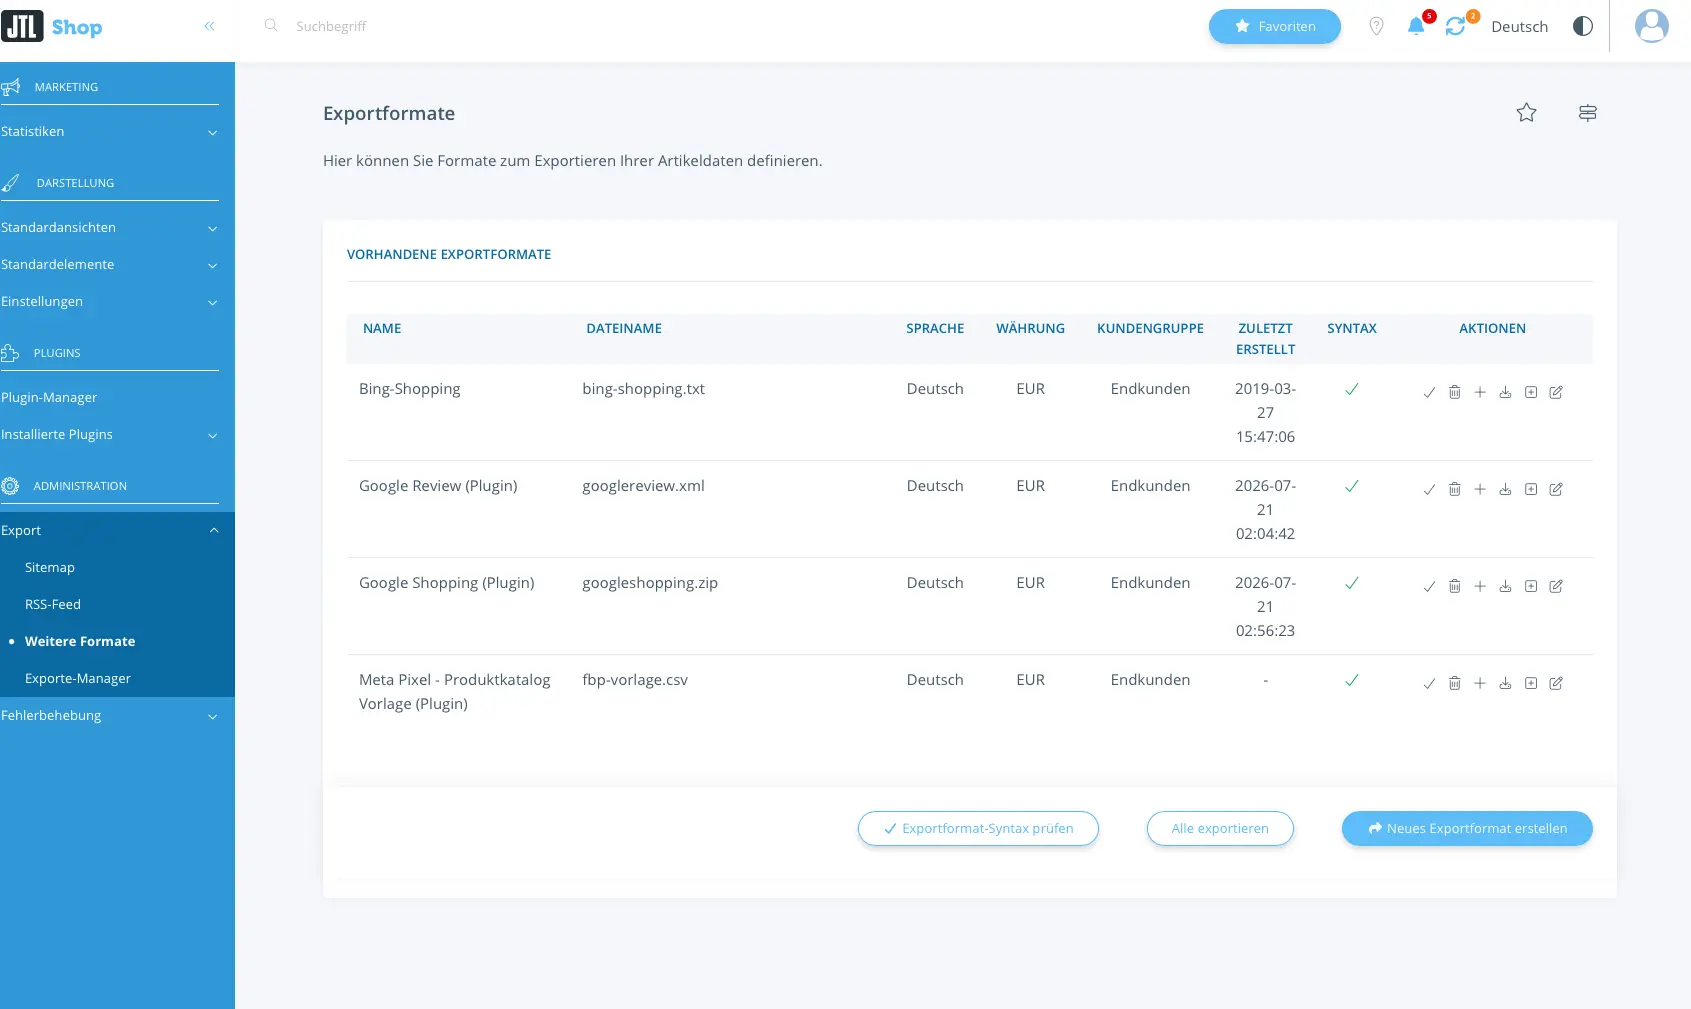
The official route runs through a free JTL plugin. You get Exportformat Google Shopping JTL-Shop 5 from the JTL extension store, install it in the backend under Plugins, My purchases, and the plugin then automatically creates an export format called Google Shopping (Plugin). You will find it under Export, More formats. The generated file is called googleshopping.zip by default and sits behind a feed URL following the pattern yourdomain.com/export/googleshopping.zip. That URL is what you enter in the Merchant Center as a scheduled fetch. What has to be in place beforehand: your domain is verified in Search Console and claimed in the Merchant Center.
Make your own copy of the export format first
JTL says so itself: changes to the standard export format are lost with every plugin update. Anyone who skips that sentence wonders months later why the feed suddenly looks different and half the settings are gone. So: copy the format, give it your own file name, and from then on only maintain the copy and point the Merchant Center feed URL at it.
The Google Shopping (Plugin) export format with the file googleshopping.zip lives under Export, More formats.
From export file to Google Ads link
Set up the prerequisites. Verify the domain in Search Console, complete the Merchant Center account: business details, shipping settings, return policies. Claim the website in the Merchant Center.
Install the plugin. Get Exportformat Google Shopping JTL-Shop 5 from the extension store, install it under Plugins, My purchases, then set language, currency, customer group and shipping country.
Create your own export format. Copy the automatically created format and only maintain the copy. In the editor set the character encoding to UTF-8 and decide deliberately whether parent, child or both article types are exported.
Check a test export. Generate the file, download it, unpack it and spot check: special characters correct, prices including VAT, availabilities plausible, image URLs reachable.
Cross-test the feed URL. Open the URL in a private browser window. The download has to start without a login and must not redirect to an HTML page.
Set up automation. Create a task in the export manager with a 24 hour interval. Additionally set up a real cron job with your host, otherwise the task scheduler only starts on every tenth page view and the feed quietly goes stale on quiet traffic.
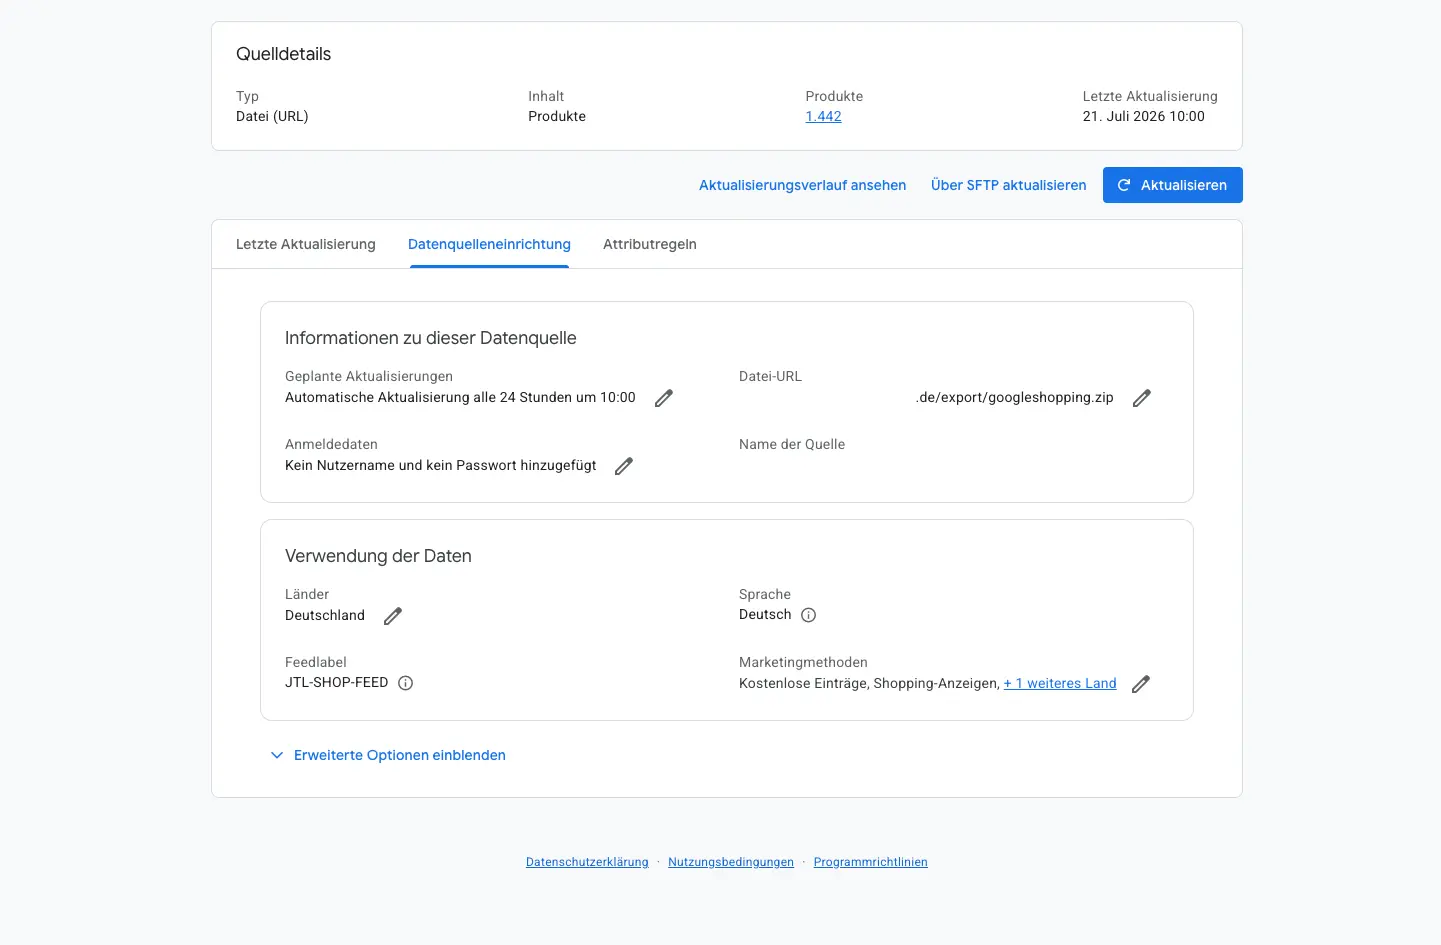
Add the data source and link Google Ads. In the Merchant Center, create a product source via scheduled fetch under Data sources and enter the feed URL. Deliberately place the fetch after your shop export, for example export at 3am, fetch at 5am. Then link the Merchant Center and Google Ads, which requires admin rights in both accounts.
The data source in the Merchant Center: scheduled fetch every 24 hours from the JTL feed URL, without credentials.
Typical stumbling blocks with the feed
Editing the standard export format instead of making a copy. All adjustments are gone with the next plugin update.
The feed URL leads nowhere. After an update, a domain change or the switch to https, Google keeps fetching the old address.
The URL points at an HTML page instead of the file. Maintenance mode, a redirect or a forced login. Always cross-test in a private window.
Encoding not set to UTF-8. The result is broken special characters in titles and descriptions. Keep the plugin up to date, older versions had bugs here.
Timeout with large catalogues. The export breaks off, the file is incomplete, and Google disables the missing articles. Use the asynchronous export and a real cron job.
Starting the campaign before the feed is cleanly processed. The first full processing can take a while. Wait for it, otherwise the campaign runs on half your range.
Security note on the feed URL
JTL explicitly points out that the export file is not password protected. Anyone with the URL downloads your complete range including prices and stock levels. If you do not want that, choose a file name that is hard to guess, or set up access protection and store the credentials in the Merchant Center.
Which campaign structure makes sense for JTL shops in 2026?
The right campaign structure depends on the monthly budget. For most JTL shops in the range of €500 to €20,000 in spend, a combination of Performance Max and targeted Search campaigns is the most pragmatic approach. In 2026, Performance Max is the primary campaign type for many e-commerce brands; across the industry, around 72% of e-commerce brands use Performance Max as their main campaign type.
For orientation when managing expectations: The average CPC in e-commerce on Google is around $1.16, while with Google Shopping Ads you get away considerably cheaper at roughly $0.66. The average conversion rate of Shopping Ads is about 1.91%. Cloudginny's clients reach 2.32% on average, which is around 21% above the average. Our top client is even at 12.3%. These are, however, cross industry averages. The actual figures depend heavily on niche, margin, and setup.
Rough orientation by spend level:
Under €1,000 per month: Focus on a single Performance Max campaign. With little data volume, Smart Bidding learns slowly. We additionally recommend a text based ad that promotes the shop's brand, so that competitors cannot bid on your brand.
€1,000 to €5,000 per month: Performance Max for the main product range, plus a Search campaign on your most important brand and category terms, in addition to the brand campaign for your online shop.
€5,000 to €20,000 per month: Performance Max segmented by margin or product groups, separate Search campaigns, a dedicated brand campaign, and targeted control via asset groups.
Example shop
Our furniture shop with a €4,000 budget falls into the middle tier. What would make sense here is one Performance Max campaign for the main product range, plus a separate Search campaign on the highest margin categories, as well as a brand campaign on the shop's name, instead of throwing everything into a single unsegmented PMax campaign as before.
Context
Performance Max has become genuinely powerful, but it is a black box if you let it run unsupervised. The default settings are not optimal for every shop, more on that in a moment.
Takeaway
There is no single correct structure, only the one that fits the budget. Small accounts need simplicity, larger accounts benefit from segmentation. With smaller budgets in particular, we try to give Google as much data as possible through simplicity.
The most common Google Ads mistakes in JTL shops
In the accounts we analyze, the same mistakes keep appearing, and they cost real budget. The following six are the ones we see most often:
Performance Max runs across all channels. PMax campaigns created by Cloudginny focus only on the Shopping placement. From our point of view, especially with a small budget and a focus on sales, the customer does not need to be served in Gmail, YouTube, or Discover.
No negative keywords, or too few. Anyone who works without exclusion lists inevitably pays for irrelevant clicks. Industry evaluations show that consistently maintained negative keywords can reduce wasted spend by around 25%. That is why it is important to review search term reports regularly and exclude anything that doesn't match purchase intent. Another frequently overlooked mistake is failing to exclude your own brand in PMax, even though a separate brand campaign is already running. As a result, both campaigns compete unnecessarily with each other.
Wrong bidding strategy for small accounts. "Maximize conversion value" sounds good, but it needs data volume. In shops under €1,000 in spend, the conversions the model needs to learn meaningfully are often missing. "Maximize conversions" is the better fit here.
Missing cart and micro conversion tracking. As described above: If only the final purchase is tracked, Google lacks valuable signals for optimization.
The product feed isn't maintained. Outdated prices, sold out articles, missing GTINs. A neglected feed undermines even the best campaign structure.
Segmented too early. Most budget losses arise not from a lack of strategy, but from unsupervised default settings, neglected maintenance, and segmenting products into different campaigns too early.
Optimize manually or automate? Where the real effort lies
All the steps described above can be done manually, but they are time consuming and have to be repeated continuously. Evaluating search term reports, maintaining negative keywords, checking Performance Max settings, fixing feed errors. This is not a one time setup, but a weekly routine task.
This is exactly where Cloudginny comes in. We have built an AI agent that takes over the ongoing Google Ads optimization for e-commerce shops, specifically for the spend range of €500 to €20,000. Instead of going through the accounts manually every week, Cloudginny continuously analyzes them, finds budget leaks, and suggests concrete optimizations. Many of them can be implemented with a single click. The typical JTL shop operator needs no prior knowledge for this.
The decisive advantage lies in the frequency: While a manual audit typically happens once a week, AI supported monitoring runs continuously. With our AI agent Ginny, you can ask any question. Ginny can analyze, optimize, and build entirely new campaigns for you. She works for you like an agency. You can find all the options and prompts here: cloudginny.com/ginny-prompts
Strategic decisions, such as which audiences to expand into or what margin the products carry, still need your own judgment. For the operational, repetitive 80% of the work, automation is a considerable time saver.
Example shop
With our furniture shop, three levers were on the table: correct conversion tracking with order value, splitting up the unsegmented PMax campaign, and consistent negative keywords. These are exactly the kinds of findings that an AI agent like Cloudginny identifies automatically and proposes corrections for, instead of the owner having to search for them manually every week.
Takeaway
The setup is a one time effort, the optimization is endless. Anyone who doesn't want to shoulder the ongoing work themselves either automates it or hands it off to an agency.
Frequently asked questions about Google Ads for JTL shops
Why isn't my JTL shop tracking conversions in Google Ads?
Usually the purchase event is missing in Google Tag Manager, or it is linked incorrectly. Without a correctly firing conversion tag that passes the order value, Google Ads cannot attribute sales, and the bidding strategy works blind. A test order with the Google Tag Assistant uncovers such errors.
What Google Ads budget do I need as a JTL shop?
A sensible entry point is at least €500 to €1,000 per month, so that Google (Smart Bidding) gets enough data volume to learn. For context: the average CPC in e-commerce is around $1.16, and for Google Shopping Ads about $0.66. With a smaller budget, a simple campaign structure and, where appropriate, manual bid control is often the better choice.
Is Performance Max worth it for small JTL shops?
Yes, but with caution. With a small budget, Performance Max should be kept tightly scoped and supervised. In particular, brand exclusions and negative keywords should be set up, otherwise the algorithm often distributes budget to irrelevant search queries.
Do I need an agency for Google Ads with my JTL shop?
Not necessarily. You can handle the setup yourself with a guide like this one. For ongoing optimization you have three options: do it yourself (time consuming), hire an agency (more expensive, from around €1,500 per month), or use an AI tool like Cloudginny (from €99 per month) that automates the operational optimization.
How often do I need to review my Google Ads campaigns?
At least weekly: review search term reports, add negative keywords, fix feed errors, check budget distribution. Automated tools take over this routine continuously rather than at single points in time.
Why does my product feed integration break off?
Two different things get mixed up here. Either the entire feed import fails, or individual products are rejected while the rest goes through cleanly. If the whole import breaks off, it is usually something technical. The feed URL is not reachable, the file is too large or runs into a timeout. It can also be format and encoding problems, such as incorrectly encoded special characters or a wrong delimiter. After a JTL update the stored URL can also lead nowhere. The fastest route to the cause is the diagnostics view in the Merchant Center, which shows the specific error including the affected rows. After that, check the export settings in JTL and call the feed URL manually in the browser to see whether a file comes back at all. If instead only individual articles drop out, that is not a break-off but a rejection due to data quality. You will find the most common reasons for that further up in the Merchant Center section.
My conversions dropped after switching consent on. Did I do something wrong?
Probably not. Modelled conversions only start coming in after a training period, so performance looks worse right after go-live than it actually is. Leave target CPA and target ROAS untouched for the first two to three weeks, otherwise you destabilise Smart Bidding on top. Check the diagnostics of the conversion action again after one to two weeks.
How often should the product feed be updated, and is once a day enough?
For most JTL shops once a day is enough. Order and reliability matter more than frequency: the shop export has to finish before the Google fetch, and the task scheduler has to run at all. Without a real cron job it only starts on every tenth page view, and then the feed is quickly two days old on quiet traffic. With very volatile stock levels, specialised feed tools are worth a look.
Summary: The most important points
The success of Google Ads for JTL shops stands or falls on three fundamentals: correct conversion tracking, a clean product feed, and a fitting campaign structure.
The most expensive mistake is missing or incomplete conversion tracking. Without a transferred purchase value, the bidding strategy optimizes blind.
The campaign structure depends on the budget: small accounts need simplicity, larger ones benefit from segmentation.
Most budget losses arise from unsupervised default settings, such as the location option "Presence or interest" in Performance Max.
The setup is a one time effort, the optimization is ongoing work, whether manual, via an agency, or automated through an AI tool like Cloudginny.
Sources
Venuelabs: Google Ads Statistics 2026 (CPC, conversion rates, Shopping share of retail search spend)
Christian Beeking is co‑founder of Cloudginny, the AI agent for automating Google Ads in e‑commerce. Before Cloudginny, the team managed more than 100 million dollars in Google Ads budget for brands such as MediaMarkt, Cisco and Bose, and has now poured that knowledge into Ginny. Cloudginny is an official Google Partner, a WebStollen partner and part of the German Accelerator.
Search for "Google Ads audit" and what you mostly get is offers: agencies that will examine your account for free, and a contract at the end. That does not answer the question underneath: what is actually being checked, how much of it can I do myself, and what does the rest cost? This article walks through the nine areas of an audit, says for each one where the money typically leaks, and attaches a checklist you can tick off.
Ryze AI is the cheaper multichannel autopilot: $89 flat for Google, Meta, TikTok and LinkedIn. Cloudginny is a Google Ads specialist with a German company behind it, Merchant Center depth and an approval model. This comparison puts prices, channels and control side by side, and says plainly where Ryze wins.
Search for Google Ads management software and you land on Optmyzr, Adalysis or Opteo. They are good tools, just built for somebody who already knows Google Ads: a marketer who writes rules and knows what to do with forty improvement suggestions. Most online shops do not have that person. This article explains what the classic platforms actually do, what an AI agent does differently, which model fits when, and what neither of them can do.